Pre-terminated cables have become quite indispensable when one wants to give a professional touch to their installation in addition to saving time. However, sometimes these can pose a problem when there is a need to route the cables through car roofs, engine firewalls or the exterior walls of buildings.
Pre-terminated cables which come with PVC caps have a small diameter size but the size of theend connectors necessitate a larger hole to be drilled for routing the cable through the firewall, roof etc. At such times, the individual has to decide between drilling a larger hole or cutting and splicing the cable. If one opts for the latter alternative there is no cause for worry. Following steps will give a fair idea of how to go about cutting and splicing the cable.
Keeping the Tool Kit Ready
First step is to keep the cable splicing kit handy as that will contain all the tools necessary for enabling you to obtain a successful splice. Some of the supplies and tools that are needed are:
- Wire strippers
- Heat shrink tubes
- Heat gun
- Solder material
- Multi-meter
- Soldering iron
- Rubber grommets
Ascertain the location of the cut
Determine the location where the cut should be made and do them. The cut should give sufficient room to rectify soldering mistakes if they do occur. The ideal position of the cut should be at least four inches away from the cable end.
Strip the insulation of cable
The cable insulation should be stripped for about an inch or so as that will facilitate the soldering and help the inner wires to be re-insulated easily. The inner wires should not be stripped for more than a quarter inch as this will ensure a good solder joint.
Prepare the wires
Stranded wires have to be twisted so that they straighten and become tight. This makes handling wires easy and enhances solder adhesion. Next, use your soldering iron to run a bead of solder through the wire so that the ends are tinned.
Apply heat shrink
Prior to the soldering work, heat shrink has to be applied to all cables, a large section to cover the entire cable and smaller parts for the individual wires. An adequate gap has to be left between the heat shrink and the solder joint that will come later.
Solder joints
Use your soldering gun to make the solder joints; a small solder bead is sufficient for that. Ensure that there are none or as less jagged ends as possible. However, any excess can be sniped off easily.
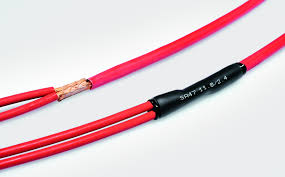
Use heat shrink tubes to insulate cable joints
Once the solder jointing is done, move the heat shrink up over them. While shrinking the new insulation, care has to be taken to apply minimal heat source to the heat shrink tubes.
Testing
Prior to routing the spliced cable it is essential to test it. This can be done with the help of a tester that is available with most multi-meters. Proper continuity of the cable can be ascertained when the multi-meter gives a beep on the test probes touching the cable ends.